UPDIG
Our industry is in a state of great change, and established ways of making and working with photographs have been supplanted by entirely new ones. The enormous capabilities and efficiencies of digital capture and delivery have revolutionized the image marketplace at an astounding rate. But they have also created gaps in creative and quality control that have frequently led to confusion, inequities, loss of quality, and unnecessary expense. We recognize the need for worldwide imaging quality and delivery standards that will facilitate reliable and repeatable image reproduction.
UPDIG – A big step forward in our industry
When the BPPA was re-formed we included ‘TECHNICAL” along with ETHICAL” and “CREATIVE” in our list of things to promote to a high standard within our industry. In line with this we have decided to endorse the UNIVERSAL PHOTOGRAPHIC DIGITAL IMAGING GUIDELINES, or UPDIG for short, proposed by a wide range of photographers’ organisations around the world. The guidelines form a complete background for how we work with digital files in order to promote “best practice”. We recognise that there are a number of reasons why press photographers might find it easy to avoid a few of the steps outlined but the BPPA still supports all 15 guidelines as something to aim for.
The Guidelines
- Manage the color. ICC profile-based color management is the standard.
- Calibrate the monitor. Monitors should be calibrated and profiled with a hardware device.
- Choose a wide gamut. Use a wide-gamut RGB color space (show footnote) for capturing and editing RGB master files. We recommend Adobe RGB (1998) or ProPhoto RGB.
- Capture the raw data. For best quality, digital cameras should be set to record RAW files.
- Embed the profiles. All digital files should have embedded profiles (should be “tagged”), unless otherwise noted. Photoshop’s Color Management should be set to “always preserve embedded profiles,” and the “ask when opening” boxes should be checked to alert you to profile mismatches and missing profiles. When profile mismatches occur, you should elect to preserve the embedded profile.
- Color space recommendations:
i) For the web, convert images to sRGB and embed sRGB profile before delivery.
ii) For display prints from professional digital color labs (show footnote), if a custom profile is available, use it for soft proofing. Then submit either sRGB or (more rarely) Adobe RGB with embedded profiles, as specified by the lab. If a lab does not have a custom profile, it’s usually best to use the sRGB color space with that profile embedded.
iii) For display prints from many consumer digital-print vendors, a database of custom profiles is available. (Show source note.) Otherwise, deliver files in the sRGB color space with embedded profile.
iv) For offset printing, it’s always best to begin by asking the printer or the client’s production expert what file format, resolution and color space they require. RGB files contain many colors that cannot be reproduced by conventional CMYK printing. This has often led to a situation where the final result looks nothing like the screen version of the file, or the inkjet print of the file. There are two ways to avoid this confusion: Files can be delivered as CMYK files. This is the “safe” way to go, because the image itself will contain no colors that can’t be reproduced by the CMYK process. Files delivered as RGB files can be accompanied by a cross-rendered guide print that includes only colors reproducible in CMYK.
v) Files can also be delivered in both CMYK and RGB. This allows the photographer to make the artistic decisions about color rendering, and gives the printer more tools to recover from mistakes the photographer may have made in converting RGB to CMYK.
vi) Ideally, CMYK image files should be converted from RGB using the printer’s CMYK profile with that profile embedded in the file. It is not always possible to get the printer’s profile, either because the printer does not have one or the client does not know who will print the images. In such cases, it’s often best to deliver an RGB master file (show footnote), with an embedded profile and a ReadMe file that explains that “for accurate color, the embedded RGB profile should be preserved” when opening the file. CMYK profiles and the RGB alternative are discussed on page XREF 6.
vii) For inkjet and dye-sub printers (show footnote), use a wide-gamut color space, such as Adobe RGB, for the source space. Use a custom profile for the printer-paper combination in the print space to get the best quality and the best match to a profiled monitor. - Formats and names. File formats should always be denoted by standard, three-letter file extensions.
i) For the web, use JPEG files.
ii) For print, uncompressed TIFFs are best. Use JPEG only when bandwidth or storage constraints require it. Use the highest JPEG quality setting possible. We recommend not using less than “8” quality.
iii) To avoid problems with files that will be transferred across computing platforms, name files with only the letters of the alphabet and the numerals 0 through 9. Avoid punctuation marks (other than hyphen and underscore), accented vowels and other special characters. Keep the full name (including extension) to 31 characters or less for files on a network or removable media, and to 11 characters or less (including the three-letter file extension) when burning to CDR, in case a recipient’s computers don’t support long filenames. For the complete guide to file naming protocol, see the Controlled Vocabulary website. - Appropriate resolution. Resolution of digital images is described by three numbers: height, width and ppi (pixels per inch). Beware: It’s easy to confuse ppi with dpi (dots per inch), which refers to the resolution of a printing device, or with lpi (lines per inch), which describes a halftone grid or screen used for printing images on a press.
The following target resolutions are meaningful only when paired with the height and width at which an image will appear in the final form:
i) Low (monitor or “screen”) resolution is defined as less than 100 ppi.
ii) Inkjet prints normally need resolutions of 180 ppi to 360 ppi.
iii) Continuous-tone printing requires resolutions of 250 ppi to 400 ppi.
The offset-printing standard is often considered 300 ppi. But resolutions of 1.3 – 2 times the halftone screen for the project are considered safe. If the images will be printed at 150 lpi, the appropriate image file resolution range would be 195 ppi to 300 ppi. - Sharpen last. All digital images require sharpening, during capture or after, and the correct amount to apply depends on the type of use and size of the final output. For most uses, it’s best to sharpen little or none during capture with a camera or scanner. Sharpening is an art, and requires study and practice. There are several schools of thought regarding proper sharpening. One recommended method is to remove capture softness using a gentle sharpening pass followed by local sharpening and/or output sharpening. Sharpening should be the final step in reproduction, because resizing and contrast adjustment affect an image’s sharpness. Sharpening is best evaluated at 100 percent and 50 percent views on your monitor, or by making a print. The most common sharpening method is to apply an “unsharp mask” filter (higher settings for higher-resolution files) to images, but other sharpening methods and Photoshop plug-in programs can be useful, too. Oversharpening creates obvious halos around edges within images.
- Delivery. Digital image files may be delivered on removable media (removable hard drive, CD-Rs or DVD-Rs), or via FTP or e-mail. If files are delivered on CD-R, the standard disc formatting is ISO 9660 or “Mac OS extended and PC (Hybrid) CD.” When delivering images on a DVD-R, make sure the recipient can read the chosen format, since there are multiple standards. Often speed and convenience require delivery by File Transfer Protocol (FTP). Although not a preferred method, e-mail delivery usually works if image files are small in number and size, and both sender’s and recipient’s internet service providers permit large attachments. E-mail delivery sometimes works better if the image files are first compressed using RLE compression software such as WinZip or Stuffit. Check to make sure the recipient can access your specific version of compressed files. Delivery by FTP or e-mail usually precludes delivery of a “guide print” (discussed below), so a disclaimer should always be included that states accurate viewing and reproduction depend on the recipient properly applying ICC color management.
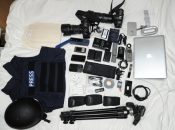
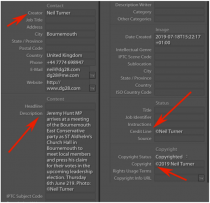
- File info. All digital image files should have embedded metadata — including copyright, usage license and contact information — that conforms to the IPTC or the newer IPTC Core standards. Photoshop users can input and edit this information by choosing “File Info” under the File menu. Adding caption, title, origin and keyword data enhances searches and organization with digital asset management applications.
- Describe what’s there. Provide a ReadMe file in either .PDF, .HTML, or .TXT format with all files delivered for output. Such files should specify image size(s), color space(s) and any licenses granted, the copyright owner’s contact information and, if certain rights are being withheld, the words “other uses, reproduction or distribution are specifically prohibited.” The ReadMe file should also include disclaimers noting recipients are responsible for following an ICC-based color management workflow.
- Send a guide. Whenever possible, include a guide print with digital image files. A guide print is typically an inkjet print that serves as a color reference for reproduction of a digital image file.
- Disk labels. Do not use adhesive labels on optical media, since they may separate and damage an optical drive. Printing directly on inkjet-writable CDRs or DVDRs is a good way to provide information such as your copyright, usage license, file lists and disclaimers.
- Long term. Archiving responsibilities should be clearly stated in writing for everyone involved. Photographers should note that charging for archiving could mean assuming liability for maintaining such archives. Prudent photographers keep back-ups on external magnetic drives, as well as on optical media and, if possible, also keep duplicate back-ups offsite.
Copyright © 2005 UPDIG. The UPDIG Working Group hopes that these Guidelines will be distributed widely, so there is no fee for permission to reproduce this copyrighted material. However, because new versions are released from time to time, we ask that you register to receive the update notices and that you agree to replace or remove any outdated versions. (Webmasters: For your convenience, a kit of parts — graphics, source files, assembly hints, high- and low-res PDFs — is available upon registration.) To register, send email to UPDIG.
Every reproduction must include the logos of the UPDIG member associations and the list of contributors; it must identify the version of the document (this is version 1.0, released in September 2005); and it must provide a link to the UPDIG web site, www.updig.org.